
Within your macOS system, there’s a file called “sudoers” which controls the deepest levels of your permissions system. This file says which users can run sudo, and what they can do when they run it. Basically, it decides who is in charge. We can edit sudoers on macOS to administer a multi-user system more effectively.
What is the sudoers file?
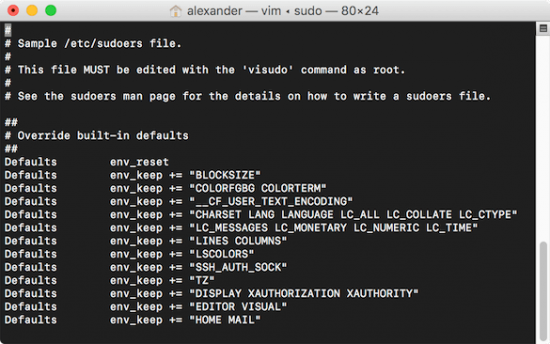
The sudoers file is a text file that lives at “/etc/sudoers.” It controls how sudo works on your machine.
If you’ve done anything with Terminal, you’ll recognize the sudo command. It allows a user to run commands as root, the all-powerful superuser on Linux and macOS systems. Sudo allows users to execute commands that would otherwise be forbidden. Its a dangerous tool, and not every user should have access to it. That’s why the sudoers file exists. It controls how users can access the sudo command.
When do I need to edit sudoers?
When you first install macOS, the first and default user will be auto-added to the sudoers file. This allows that account to run administrative tasks with the sudo command by default. Standard, non-admin accounts created afterwards won’t have sudoers permission by default.
If you need to grant a standard non-admin user permission to run sudo, you will need to edit sudoers to manually add the user account. You do not need to edit sudoers to add admin accounts, unless you want to limit an accounts superuser access.
If your Mac is only a single-user device, it’s unlikely that you’ll have any particular reason to edit the sudoers file. Your admin-level accounts are automatically added by macOS, and controlling other users is irrelevant. System administrators, even small ones, might want power over who can run sudo and for what purpose. But as long as single users have root-level permissions, personal machines like don’t require you to edit sudoers.
How can I edit sudoers?
You must edit sudoers with the visudo command. Using a regular text editor is technically possible, but its an extremely bad idea. Edit sudoers with TextEdit or similar and you can easily corrupt the sudoers file. A corrupted sudoers file means admin access is completely impossible until the file is fixed or replaced.
To edit sudoers, you’ll execute the visudo command in Terminal. The visudo command opens the sudoers file properly and prohibits simultaneous edits.
sudo visudo

You need administrator access to run visudo. That only makes sense: we don’t want any old fool to edit sudoers.
The visudo command will open the sudoers file in vim by default. If you’re not sure how to use vim, make sure the follow the instructions below carefully. vim relies on keyboard commands rather than mouse input, so it can be a little unfamiliar for modern-day users. Returning users may want to check out a vim cheat sheet for a quick key command reference.
What can changing the sudoers file do?
The sudoers file’s main job is defining which users can use sudo for what. It also holds some simple preferences, which we can adjust first to get a feel for how visudo works.
Change the sudo timeout
By default, entering your sudo password elevates your permissions until you close the shell or exit. This can be insecure, and some might prefer entering their password each time they use sudo.
1. Run sudo visudo as mentioned above.
2. Press Shift + G to jump to the end of the document.
3. Use the arrow keys and Enter key to create a new line at the bottom of the document. Then add the following line:
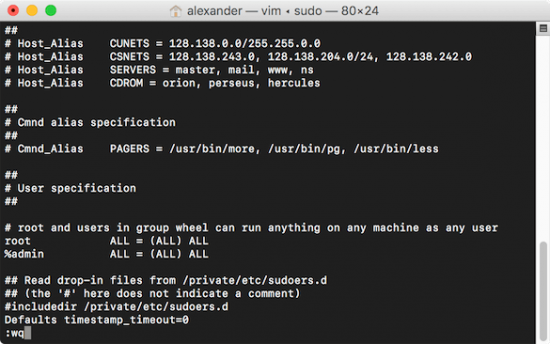
Defaults timestamp_timeout=0
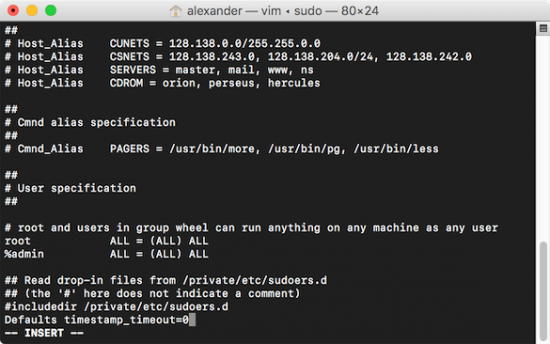
This will set your sudo timeout to zero seconds, so you’ll have sudo permissions for zero seconds after you execute the first command. If you prefer a different interval, enter that value in seconds instead.
You can also set the timeout to “-1,” which gives you an infinite grace period. Don’t do that. It’s a handy way to accidentally nuke your system one day.
4. Now that we’re done, we have to save and exit the document. Vim noobs, this is weird. First, press the Escape key. Then, type :wq, exactly as written, and press Enter to execute. This will write the file, then quit vim.
Limit who can use sudo and for what
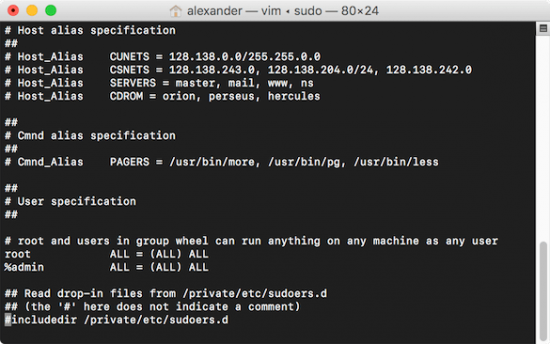
The main purpose of the sudoers file is to control which users can run sudo. Without sudo, users can’t elevate their permissions. If you have multiple users accessing the same system through shells, you can control their root access by setting values in sudoers.
Every sudoers file will have the following line, typically towards the bottom.
root ALL=(ALL) ALL
We don’t want to edit this line, but let’s use it as an example. This line enables the root user on ALL hosts using ALL users to execute ALL commands. ALL is a special value in the sudoers file meaning “no restrictions.” The syntax for this permission-granting line is as below:
username hostlist = (userlist) commandlist
Let’s quickly define those terms:
- The username is the name of the user.
- A host is the device the shell originates from.
- The user is the currently logged-in user.
- The command list is a list of commands the user can run.
The username and the command list are the most important variables. They control who can run sudo, and what commands they can run when using sudo. You’ll likely leave the hostlist and userlist variables set to ALL.
If you want to add another user as root, simply copy the root line and change the user like so. Note that everything is the same as the root command, but with the username changed:
alexander ALL=(ALL) ALL
Now let’s look at the commandlist variable. If we add a specific command, the user can only run that command with sudo. We have to write down the path to the file that describes the command, typically found in /usr/bin/, /usr/sbin/, /bin/ or /sbin/. For example, if we want to limit our user’s use of sudo specific commands, we could use the line below:
alexander ALL=(ALL) bin/cp/, /sbin/reboot, /usr/sbin/chown, usr/bin/ditto
A “%” at the front of the username describes a group of users. The line below would allow every user in the group “admin” to have root-level permissions. This would be the group and constituents as defined by macOS.
%admin ALL=(ALL) ALL
Change the visudo editor to nano
By default, macOS uses vim as the visudo editor. As we’ve seen, it can be a little clunky. If you’d prefer to use nano, which is easier to understand, you can change that.
1. Open your ~./bash_profile file by running the command below:
nano ~/.bash_profile
2. Add the following line near the top of the document, where variables are defined with export:
export EDITOR VISUAL='nano'
3. Press Ctrl + O to save the document and Ctrl + X to exit the document.
4. Restart Terminal. The next time you run visudo, nano will be the text editor instead of vim.
If you want to take your Terminal skills to the next level, check out these other pro Terminal commands:

3 thoughts on “Pro Terminal Commands: How and Why To Edit Sudoers on macOS”
For the sake of slightly tighter security, I always set up a new system with an administrator account, then immediately following the initial setup, create a non-privileged user account. This non-privileged account will actually be the normal user account which adds one minor layer of security in that the system will pester you for the administrator password for anything outside the realm of normal usage.
My thought behind this is anytime the system asks for my administrative user and password, it gives me a chance to review exactly what the request is for. It doesn’t fix the problem of human error but it does give it a chance to be slowed down.
Absolutely a great idea! It also prevent an account breach from nuking your system. If your standard account is breached, the attacker won’t automatically get administrator access. We also mentioned some of the other reasons in this associated post:
https://www.applegazette.com/mac/why-your-admin-account-could-be-a-security-risk/