

There was a time that to record screen activity on your Mac you had to purchase bulky software that never really interfaced well with the Mac and worst of all, was very expensive.
Thanks to updates done to QuickTime in OS X 10.6, you can now record anything happening on your screen and save it as a movie file without using any additional software. The technology to record your screen is built right into QuickTime itself. Whether you’re making a software tutorial or recording an error to help someone troubleshoot it for you, recording your screen is pretty useful, and here’s how you do it.
SEE ALSO: Everything You Ever Wanted to Know About Screen Shots in OS X
Recording Screen Activity in OS X
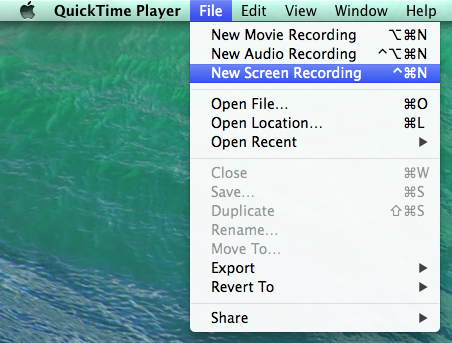
First open up QuickTime Player (Applications > QuickTime) and in the File menu and select New Screen Recording.
Note: When you run QuickTime Player, there’s no window that opens up. You will only see the QuickTime icon in the Dock.
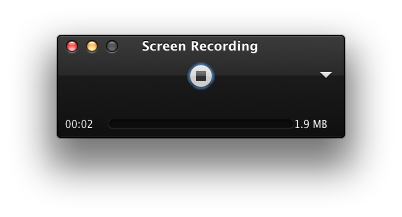
Once you make the selection, you’ll see see this window appear:

To start your recording just click the red Record button in the center of the window. Once you start the recording you’ll see this appear on the screen:

If you want to record the entire screen, click the words that appeared. If you’d rather record only a selection of the screen, drag a selection window around it and resize as needed. When done, click the button in the center of the window that says Start Recording.
To end the recording hit Escape on your keyboard and click the Stop button. You can also stop the recording by hitting Command + Control + Escape on your keyboard.
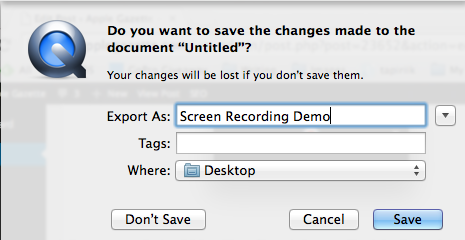
Once you click Stop, you’ll have the chance to save your recording.Click File > Save and enter a name and a place to save the file.
With this step, you’re all done. While it really is this easy to record your screen, there are a few options you can set to make it better.
Other Options
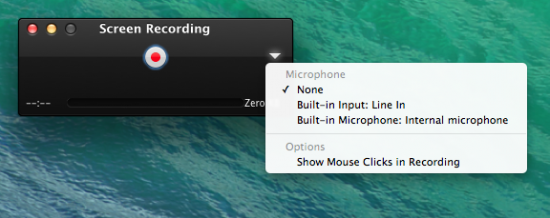
the down arrow to the right of the Record button when you open up the screen recorder will give you access to a few options. First, you can choose whether or not you want audio recorded, and if you want it to be a line-in or a microphone. Next, you can tell Quicktime whether or not you want mouse clicks to show in the recording. This can be useful if you’re demoing software, but not so much if you’re showing a general issue.
Once you have everything set up the way you want them to be, you’re set to do your recording. Once everything is saved you’ll be left with a MOV file that you can share any way you like.


2 thoughts on “How to Use Screen Recorder in OS X Mavericks”
I would like to use the Quicktime feature for screen capture, however my iPad is not listed in the drop down menu.
I have OS X 10.9.5 and iPad 2 version 8.2. I see my iPad in I tunes but not in the quicktime screen recorder application. As well, I have my iPad connected to my Mac via lightening cable. What to do? I am missing a setting?
Thanks for any help MP
While sceencasting is quick and easy with QuickTime, it doesn’t offer any advanced features such as highlight effects and multiple recording formats which more advanced solutions like Acethinker Screen Grabber do.