

When Apple released iOS 5 back in 2011 it added the incredibly useful ability of OTA (over the air) updates. That meant that you no longer needed to connect your device to a computer to install the latest software upgrades, as they could be downloaded and installed directly on the device itself.
For many of us, OTA updates meant never having to plug our phones or tablets into our computers again, which at the time seemed very convenient. But with the release of iOS 8, many users are finding they don’t have enough free storage space on their device to complete the OTA process, and so they are left stranded on an older piece of software, unable to take advantage of any of the new features.
But iPhone and iPad owners are far more likely to find success with their software updates if they connect the old fashioned way using iTunes. Here’s exactly how you do it.
Step 1: Back-Up Your Device
Before you attempt to update any iOS device, always be sure to back it up first. This can be accomplished by plugging the iPhone, iPad, or iPod Touch directly to your computer, and letting iTunes create a back-up file for you.
Alternatively, you can also tell your device to sync with iTunes via Wi-Fi, which saves the step of having to plug it into the computer directly. This feature can be turned on under Settings > General > iTunes Wi-Fi Sync.
Finally, you can also save a back-up to iCloud by selecting the option to do so under the Settings app > iCloud > Back-up. This will automatically create a full back-up file on your iCould account. Once the back up has been made, you can proceed with the iOS update process.
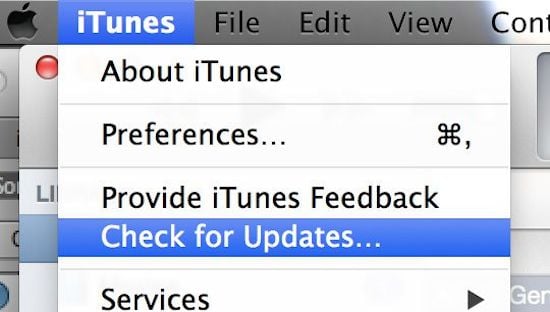
Step 2: Check for iTunes Updates
Before starting an iOS update, you should also make sure you’re are using the latest version if iTunes. Launch the program, and from the “iTunes” menu, select the “Check for updates” option. The software will then contact Apple’s update server to check for a more recent version of the software. If one is available, it will automatically download and install that version on your computer as well. Once it has completed the update process, and iTunes has restarted, you can move on to the next step.
Step 3: Plug in Your Device
Next, you’ll want to connect your iPhone or iPad directly to your computer. Depending on the age of your device, you’ll either plug-in a 30-pin or lightning cable to your Mac or PC’s USB port. The iTunes software should detect the device, and automatically launch itself, but if it doesn’t, launch the software manually instead.

Step 4: Select Your Device
Once iTunes has launched, and completed its initial sync, you’ll need to select the iPhone or iPad that you want to update. Find the “Device” button in the upper right corner of iTunes, and click on it. You should see all of the iOS devices that are connected to your computer listed there.
Choose the one you wish to update, and its dedicated page in iTunes should appear, providing with you a host of information about the phone or tablet, including serial number, storage capacity, and the version of the operating system it is currently running.
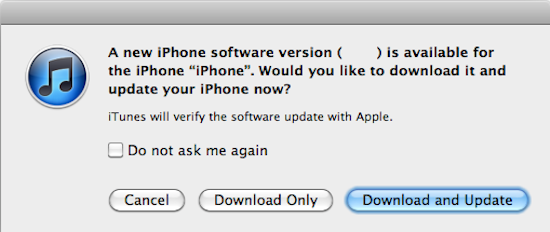
Step 5: Check for iOS Updates
The iTunes software should automatically detect that an update is available for your phone, and ask if you want proceed with the upgrade. Click on the “Download and Update” option to get the process started. If iTunes doesn’t automatically detect the need for an upgrade, you can force it to search for one by choosing the “Check for Update” option found on the device page. Once the new version of iOS is found, click the option to proceed.
From there, the process is straightforward, and pretty much automated. Simply follow the prompts in iTunes, and on your iPhone or iPad screen to complete the update. Depending on your Internet connection speed, and the age of your device, it could take anywhere from a few minutes, up to a full hour to finish. Be patient, and whatever you do, don’t unplug your iPhone until the process is completely done.
It should be noted that you’ll still need some free space on your iPhone or iPad to install iOS 8 using this method, but it will be a lot less than if you did it using the OTA method. If you’re still running into problems however, clear some music, videos, or photos from your device, then re-sync those items back over after the upgrade is complete.

3 thoughts on “How to Install iOS 8 When Your Device is Low on Storage”
Do I have to connect to my computer in order to update my iPad
You can do it over the air (Wi-Fi) or via iTunes (computer).
I need to update my iPad which only has iOS 5.1 checking for updates tells me that I am up to date which I am clearly not