
Dual-booting macOS and Ubuntu requires a brave spirit, but it’s not too difficult. It’s not too hard to install Ubuntu and dual-boot a macOS/Linux configuration.
Linux is an amazing environment for development and programming. But be warned that some hardware functionality might never work right under Ubuntu. This could be core stuff, like USB-C, or minor stuff, like the Touch Bar. You never really know until you try. Macs can be weird under Linux, especially with the operating system’s historical lack of driver diversity. Only go ahead with this if you have the technical chops (and patience) to troubleshoot a buggy system.
Before you make any major changes to your system, you should back up your Mac. That goes double for something as invasive as re-partitioning your boot drive, which we will need to do later on. So back it up or risk your entire system.
1. Download Ubuntu
Head over to Canonical’s website and download the most recent long-term support (LTS) version of Ubuntu. As of publication, that version is Ubuntu 16.04.4 LTS. We want to make sure we get the AMD64 ISO file, so it will be compatible with the 64-bit chips in modern Macs.
While your there, send Canonical a couple bucks. They’re a great organization creating a great operating system.
2. Create Your Ubuntu Installation Drive
We will use a USB drive for this example. The drive needs a capacity of at least 2GB, and it should be empty. We’ll format it to remove any data before creating our Ubuntu install media.
Formatting the Drive
1. Open Disk Utility and select your USB drive in the sidebar.
2. Click “Erase” in the menu bar to format the drive.
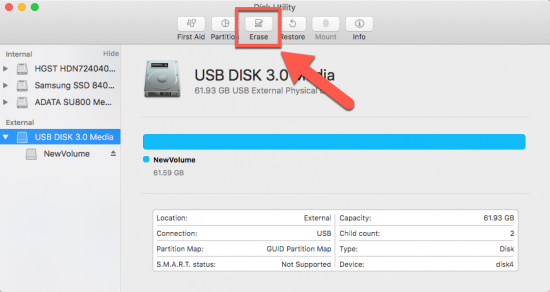
3. Set the format to “MS-DOS (FAT)” and the scheme to “GUID Partition Map.” The actual format is super important here, so don’t tweak that.
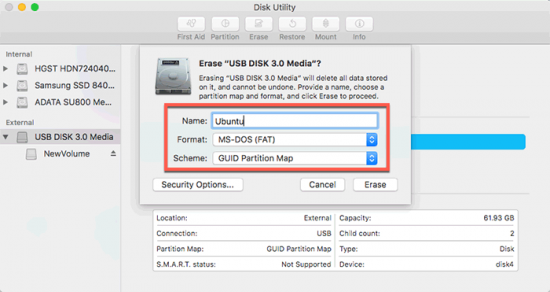
Disk Utility is, unfortunately, a little buggy sometimes. If the format doesn’t work the first time, try again a second time. If Disk Utility persistently disagrees with you, try doing the same thing with Terminal and diskutil.
Writing the Image
We can’t just drag and drop the Ubuntu image to a disk. We need to “burn” or write the filesystem of the ISO to our disk. To accomplish that, we will download and install Etcher.
1. Click “Select Image” and find the Ubuntu ISO that you downloaded in the first step.
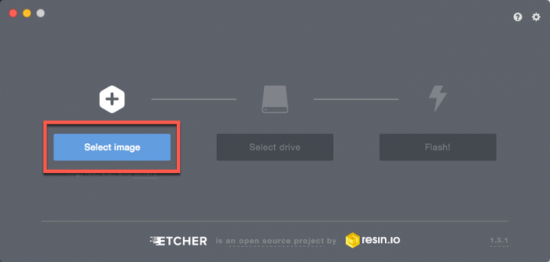
2. Click “Select Drive” and choose your USB drive.
3. Click “Flash” and wait for your burn to complete.
3. Preparing Your Boot Drive
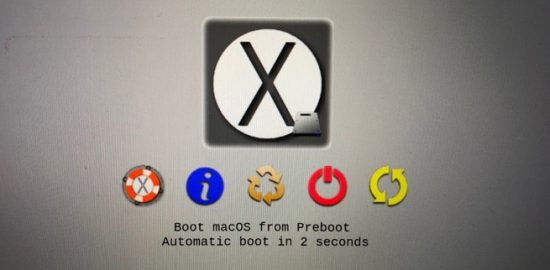
This is where things can start to get a little hairy. Macs don’t have the easily accessible boot menu that Windows systems offer, which means we need to install our own bootloader. rEFInd will be our bootloader for both Ubuntu and macOS.
Installing rEFInd
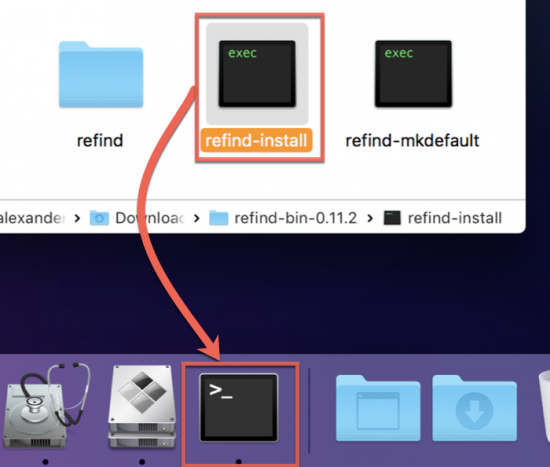
1. Download and unzip rEFInd’s binary package from SourceForge.
2. Locate and drag the “refind-installer” shell script on to Terminal. This will run the installer script.
3. Reboot your Mac to make sure you see the rEFInd boot menu. If you don’t, follow the troubleshooting tips on rEFInd’s website.
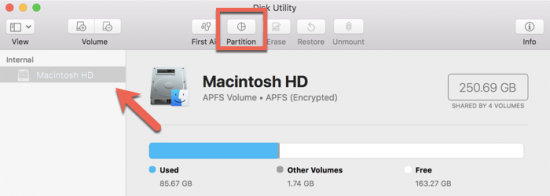
Resizing The Boot Partition with Disk Utility
This is the no-take-backs step. Once we do this, we’re in data loss territory. Back up now or forever hold your peace!
MacBooks and MacBook Pros only have the one hard drive these days. To install Ubuntu and dual-boot with macOS, we need to make an Ubuntu partition on our boot drive. f we want to dual boot macOS and Ubuntu from the same hard drive, we’ll need to make a partition for Ubuntu with Disk Utility.
1. Select your boot disk in the sidebar and click the “Partition” button
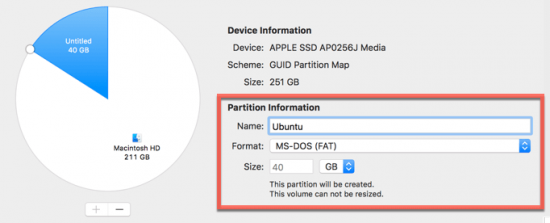
2. Click the “+” button to add a partition
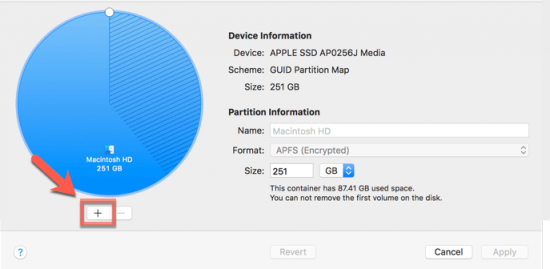
3. The partition type isn’t very important, but choose “MS-DOS (FAT)” just in case the Ubuntu installer takes some kind of issue with APFS or HFS. It will be overwritten as ext4 by the Ubuntu installer anyway. Make sure you cut off enough of the disk: 20 GB is probably the bare minimum space for a usable system with storage and application space.
Again, it would not be unusual to encounter a Disk Utility error here. To get around this, you may need to remove local Time Machine snapshots. You can also use Terminal to partition the drive.
4. Install Ubuntu
With all that accomplished, we are finally ready to install Ubuntu on our Mac! Unfortunately, high-quality screenshots were not available for these steps.
Reboot your Mac, select the Ubuntu installer in the rEFInd menu, and we’re off to the races.
Running the Ubuntu Installer
1. Choose “Something Else” on the installation selection screen.
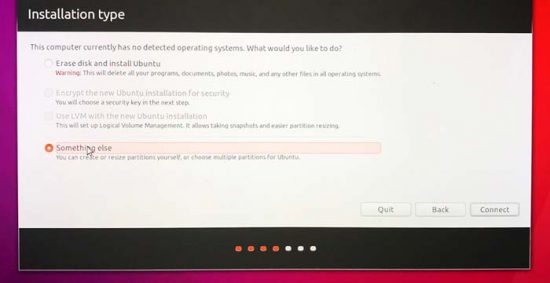
3. Select the partition you created on your boot disk earlier. Click the “—” button to delete it and replace it with free space.
4. Make sure the free space is selected. Click the “+” button to create a new partition.
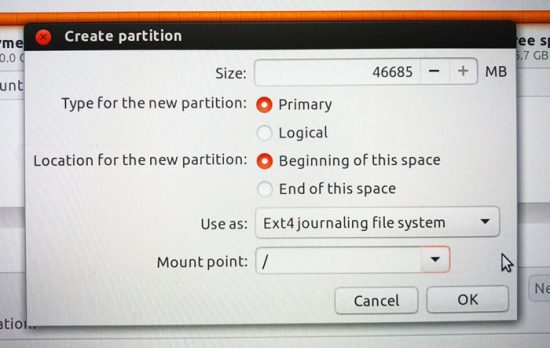
5. Set the first partition’s size to 4000 MB and “Use as” to “swap.” Unsurprisingly, this will be the swap partition.
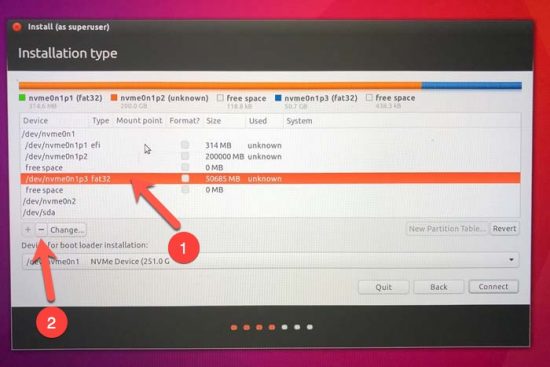
6. Again, make sure the free space is selected and create a new partition from the remaining free space. Set “Use as” to “Ext4 journaling file system.” Set the mount point to “/”
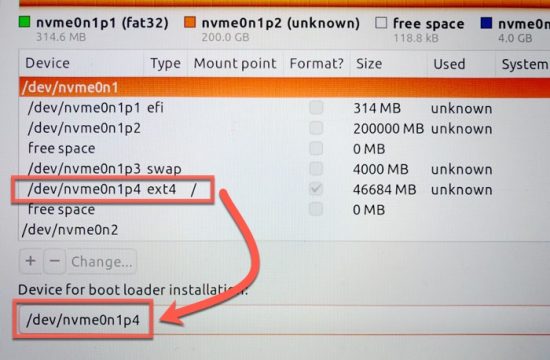
7. Under “Device for bootloader installation,” choose the partition you just created with the “/” mount point.
8. Finish up the installer as normal, creating your user and booting in the OS.
Conclusion: Setting Up Boot Order
Once you get into Ubuntu, don’t restart! If you do, your Mac will almost certainly start up in the Ubuntu partition automatically. However, this isn’t what we want. We want to use rEFInd as our bootloader so we can select our operating system at each boot. To reassert rEFInd’s rightful dominance, follow the instructions in this guide to use efibootmgr from within Ubuntu to solve the problem.
You might also like the following posts:
