

Mac creators tend to outgrow a basic editor at a predictable point. It arrives when one project needs a moving subject held in frame, a background corrected without touching the presenter, and captions accurate enough to publish. Those are ordinary requests, yet the usual answer is a jump to film post-production software.
Wondershare Filmora 16 sits between those two positions on macOS. It carries the manual controls that gap calls for, and points its AI at the repetitive work rather than the creative decisions. What follows is what the Mac build does, where each tool sits, and what to confirm first.
Part 1. What Filmora 16 Adds to the Mac Workflow
Filmora 16 brings several professional and AI-assisted tools into the Mac workflow. Each feature supports a different stage of editing, from preparing footage and recording to refining visuals, correcting captions, and reframing specialized content.
| Capability | What It Does | Where It Sits |
| AI Media Analysis | Returns content keywords for selected video and image files, listed under Media Analysis Results | Before the edit, while footage is chosen |
| Multi-Source Recording | Captures the screen with microphone, system audio, and camera in one session | At capture, ahead of everything else |
| Camera Tracking | Follows a “Head,” “Body,” or “Custom” area and keeps it framed through the shot | During the cut, wherever a subject moves |
| Color Mask | Confines a color change to a rectangle, circle, or shape you draw | Picture refinement, after the edit locks |
| Smart Text Correction | Marks doubtful subtitle lines while Speech to Text generates them | Captions, after the timeline stops moving |
| 360° Video Reframing | Outputs flat footage from whichever view of a spherical source you pick | Specialist source footage, early in the edit |
Reading down that last column shows the connected part. Material arrives already labeled, gets cut and framed, has its picture corrected, receives captions, and leaves as one export. No stage hands a clip to a second application and waits for it to come back.
Part 2. Recording and Editing on Mac
Recording comes at the beginning of the workflow, and Filmora 16 handles it directly on Mac without requiring a separate utility. The Screen Recorder is available from the startup screen, while users already inside a project can access the same recording tools through “File > Record Media” or the “Record” menu in the Media panel.
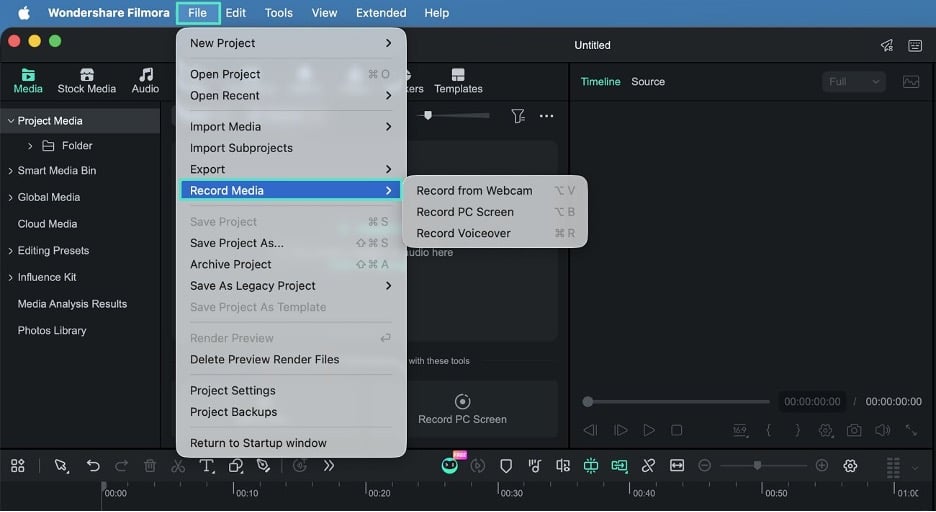
Multi-Source Recording brings screen, camera, microphone, and system audio capture into one recording workflow. Supported recorded sources remain separately editable after recording, giving creators more control over layout, picture, and audio during post-production. Before recording begins, creators can configure capture settings, recording preferences, and camera placement from the same panel.
- Capture Mode: Choose “Area,” “Full Screen,” or “Window” depending on what you need to record. Area mode also lets you resize the capture region before recording begins.
- Extra Sources: Enable the microphone, system audio, or camera as needed. Each source can be switched on directly from the recording panel.
- Recording Preferences: Adjust settings such as frame rate, recording quality, countdown timing, and mouse-related options before starting the recording.
- Camera Placement: Resize and reposition the webcam overlay so it does not cover important content or interfere with what you are demonstrating on screen.
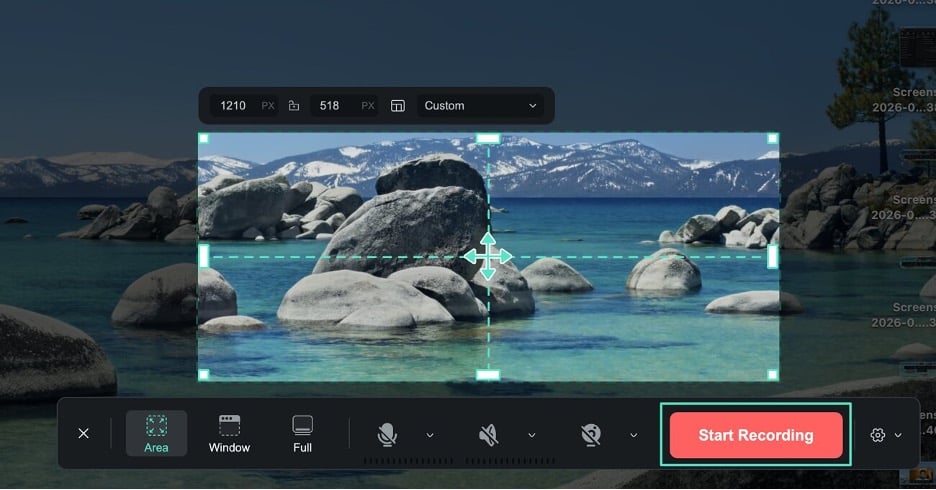
Once recording is complete, the captured source material can move into Filmora’s editing workflow as separately editable content. Creators can then refine the recorded elements according to the needs of the final video.
Note: The permission sits under “System Settings,” then “Privacy & Security,” then “Screen & System Audio Recording.” Granting it once is enough, though discovering it halfway through a session costs a take.
With the required permissions enabled, Multi-Source Recording can support software tutorials, online courses, product demonstrations, presenter videos, reviews, podcasts, and interviews. Screen Annotation runs during the take itself, so a point can be drawn, highlighted, or labeled as it is made.
Part 3. Where AI Can Save Time on Mac
Everything that session produces must still be found, framed, corrected, and captioned. Each of those repeats in a different way, so the AI tools are pointed at one job apiece rather than at the whole edit.
| The Repetitive Job | What the Tool Actually Does |
| Finding usable clips | AI Media Analysis returns content keywords for a chosen clip, which makes a long recording easier to sort |
| Holding a moving subject | Camera Tracking follows a selected Head, Body, or Custom area, reducing the need to manually reposition framing as the subject moves. |
| Checking a transcript | Smart Text Correction flags uncertain lines, as long as it is enabled ahead of transcription |
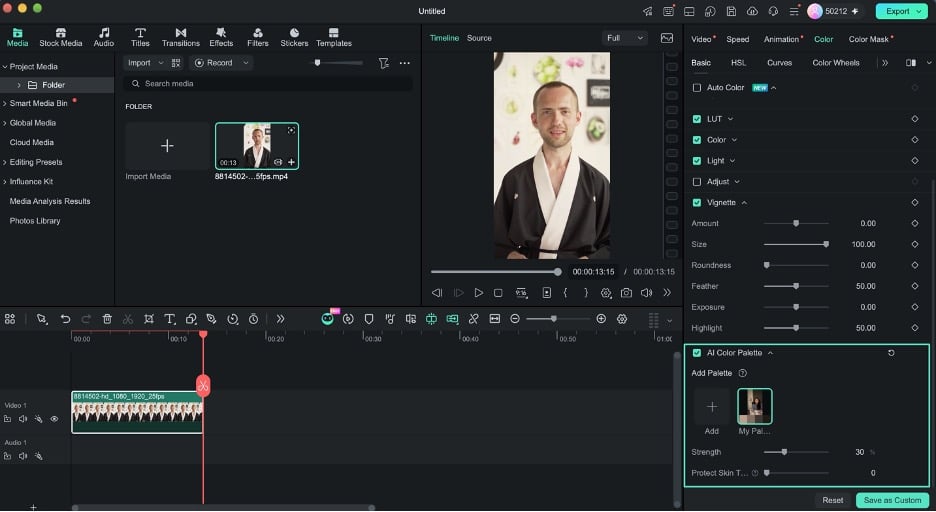
| Matching color between shots | AI Color Palette pulls a palette from a reference clip or image onto your footage |
Anyone weighing Mac video editing software should ask what stays adjustable after each of those has run. On the color side, the answer is nearly everything.
Note: AI Color Palette is reached through “Color” and then “Basic.” A “Strength” slider running from 0 to 100 sets how far the match goes. “Protect Skin Tones” keeps faces from drifting when everything around them moves. Saving the result as a palette template reapplies that look to later clips in one click.
AI Media Analysis has one important limitation to keep in mind. It works with video and image files, while standalone audio files are not supported. That means a separately recorded interview track must be reviewed manually. The analysis window also displays the credits required for each run, which is useful to check before processing a large batch of footage.
Part 4. What Mac Users Should Check Before Starting
Those 4 tools assume the footage already opens in Filmora, which is not automatic for every Mac source. Most of what a Mac shoots works straight from the card, but a few source formats need one step beforehand.
| Ready to Use on Mac | Needs Something Settled First |
| Spherical MP4 that still carries its 360º metadata | Insta360 .insv files, which convert through a Windows-only process |
| Camera Tracking, Color Mask, and Smart Text Correction on any supported Mac | DJI .osv files, which need an MP4 export from DJI software |
| AI Media Analysis across video and image files | 360 reframing, which asks for macOS 11 and an M1 chip or newer |
| Multi-Source Recording, after one visit to System Settings | Standalone audio, which AI Media Analysis does not read at all |
Mac users shooting 360º should therefore plan around exported MP4 rather than the native camera container. The conversion still happens, but it happens before the footage reaches the timeline, which is a scheduling detail rather than a limitation.
Note: Filmora’s general Mac system requirements differ from the requirements for some specialized features. In particular, 360° Video Reframing requires macOS 11.0 or later and an Apple M1 chip or newer. Check the latest Filmora system requirements before working with more demanding formats or features.
Project type decides which features matter most. Vlogs can benefit from tracking and color tools, while tutorials rely more on recording and annotation. Interviews can use caption tools, product content can combine recording with picture refinement, and social videos can benefit from reframing. A Filmora free download puts the complete Mac build on the machine, which matters more than any feature list.
Conclusion
Filmora 16 keeps the Mac editing workflow connected from footage organization and recording through tracking, color refinement, and captions. Its AI tools reduce repetitive production work while leaving creative decisions in the editor’s hands. Manual controls for tracking, masks, and color adjustments remain available, giving Mac creators greater control without adding unnecessary complexity to the editing process.
