
Downloading and Installing Onyx
1. Download Onyx from the developer’s website. There’s a specific version of Onyx for each major release of macOS, so make sure you download the right one. The current version for macOS Sierra is 3.2.3.

2. Install Onyx from the downloaded disk image.
Starting Onyx
1. Open Onyx from the Applications folder.

2. Enter your administrator username and password. In order for Onyx to fiddle with deep system functions, it needs admin access to run. It won’t make any changes until you actually do something.

3. You’ll also need to agree to Onyx’s terms of use. After you read them, untick “Display at launch” to avoid seeing the agreement every time you open the application. Then click “Agree” when you’re done.

4. Onyx also likes to verify the structure of your system disk up front. You don’t have to do this if you’re only planning on using the customization features of Onyx, but it should only take a moment and will reveal any potential problems with your startup disk. Click “Continue” or “Cancel,” as you like.

5. When the optional disk verification has been completed, click “OK.”

Revealing the Customization Menu
1. Click on the “Parameters” menu item in the Onyx menu bar.

2. Wait for the macOS parameters to be read from the file. This will only take a few seconds

3. This will now reveal the parameters menu, which contains most our options to customize macOS.

Parameters Submenu
The “General” menu contains many of the most useful system tweaks to customize macOS in Onyx.
1. Under the “Misc. options” menu, you’ll find a few settings you can tweak.

- Show graphic effects when opening a window: toggle the visual effects seen when opening and closing windows.
- Show the rubber-band scrolling: toggle iOS-style “bounce” behavior that occurs when you try to scroll past the end of a window.
- Show the location path of the current desktop picture on the desktop: Show the file path of the desktop image in the middle of the desktop.
- Turn on the accent menu from the keyboard: toggle the ability to access the accent menu from the system’s keyboard.
2. Speed of display sheets: adjust how quickly “sheets,” or temporary program dialogs (like “Save” and “Open” prompts) are hidden and revealed.

3. Speed of display of help tags: adjusts how quickly tooltips will appear when you hover your cursor over an interface item, like a button.

4. Animated desktop background: choose from a list of preset animated backgrounds for your desktop.

Customizing your screenshot settings
In the section below the miscellaneous options, you’ll see a bunch of controls for customizing your screenshot options.

1. Screen capture format: Sets the file type for future screen captures.

2. Display shadow in window captures: Toggle the “drop shadow” effect applied to full window screen captures.

3. Include the date and the time in the name of captures: Toggle the appearance of date and time in your screen capture’s filenames. If you turn this off, your screen captures will get a numbered suffix instead.

4. Path: Change the location where new screen captures are saved. Click the “Select…” button to open a Finder window and choose a new location.

5. Name: Change the string that starts the name of a screen capture. If you leave “by default,” files will be named with “Screen Shot.” You can replace that text with anything you want, provided it’s allowed by the file system.

Confirming Changes
When you make changes, Onyx will often ask to restart a service to apply that change. For example, if you change the path of your screenshots, you’ll need to restart the SystemUIServer process.

Click “Continue” in the dialog box, but first confirm that the restarting process isn’t in the middle of an operation. That’s not important for something like SystemUIServer, but be careful with apps like Finder.
Customize macOS with popular tweaks
There are many more customizations available in Onyx than can be covered in one post, but here are a few favorites.
Set a custom login background picture
Change your login background picture to something more exciting. Keep in mind that only .png files will work here.
1. Click the “Login” tab.

2. In the “Background” section, click the “Select…” button to open a Finder dialog and pick a new image. Only PNG files are compatible.

Show a message at login
This will display a custom message at the login window, below the password field.
1. Click the “Login” tab.
2. Check “Show message in the login window.”

3. Type a message that will be permanently visible to all users at login, then click “Apply.”

Turn off disk image verification
This will disable the disk image verification process, which can be disabling slow for larger disk images and slow hard disks.
1. Click on the “Applications” tab.

2. Uncheck “Verify disk images (.dmg).”

Turn off Time Machine Local Backups
This setting disables Time Machine’s local snapshots, which are made to the system disk when Time Machine is temporarily disconnected from its main backup disk. These local backup files can take up a ton of space, making them unwieldy systems will smaller SSDs.
1. Click on the “Misc.” tab.

2. Click the “Turn Off” button next to “Time Machine local backups.”

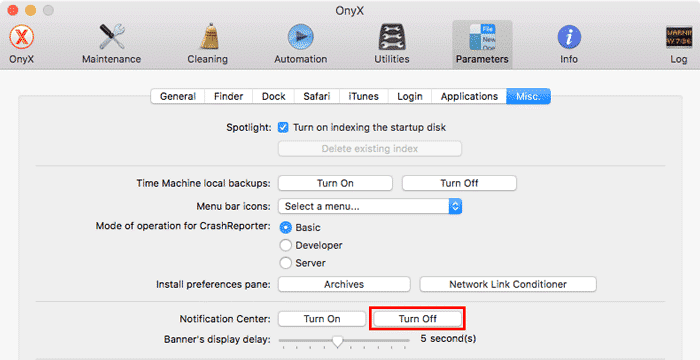
Turn off the Notification Center
This tweak will completely disable the notification center (and all its notifications) so don’t do this unless you have a replacement utility like Growl up and running.
1. Click on the “Misc.” tab.
2. Click the “Turn Off” button next to “Notification Center.”
Conclusion
There is a lot more that Onyx is capable of, so explore the “Parameters” menu to find more options.
Keep Your Mac Running Smoothly with Onyx
Lesser-Known Mac Tips, Tricks, and Customizations


