Since the U.S. government passed legislation allowing Internet service providers to sell their users’ browsing history, the web has exploded with conversations about how to protect yourself from your ISP’s surveillance. The best method is to use a VPN to protect your Internet traffic. A VPN makes it impossible for your ISP to spy on you by passing all your web traffic through an encrypted “tunnel,” hiding the contents of your web browsing session from view.
Getting a VPN set up typically isn’t too challenging. You’ll need to sign up with a VPN provider first, and then follow their setup instructions. Most VPN providers supply their customers with custom VPN clients to connect to their network. This software ranges from inoffensive to non-functional, and it can be a point of frustration for users.
If you’re annoyed by your provider’s software, you probably don’t have to use it. Most providers also support OpenVPN, which is an open-source VPN application that runs through a separate software client. The best-knowing application to set up OpenVPN configurations on your Mac is Tunnelblick, and it’s excellent. Follow the steps below to set up OpenVPN configurations with Tunnelblick and ditch your VPN provider’s clunky client.
Set Up OpenVPN with Tunnelblick
To set up OpenVPN on your Mac, you’ll need to install Tunnelblick from the developer’s website and install the necessary OpenVPN configuration files from your VPN provider.
1. Download and install the most recent stable version of Tunnelblick from the developer’s website.

2. The first time you open Tunnelblick, you’ll see a message about requiring VPN configuration files. Click I have configuration files – you’ll get these from your VPN provider in the next steps.

3. The next window explains how to set up OpenVPN configuration files. Click OK.

4. The above-mentioned OpenVPN configuration files should be available from your VPN provider. You’ll likely received a ZIP archive containing a variety of files with the .ovpn extension. These files include all the data about your VPN services that Tunnelblick will need to get the connection functioning. To obtain these files, you might need to contact customer service, visit your VPN’s support pages, or do some Googling.

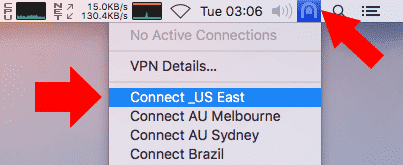
5. After you’ve downloaded the necessary OpenVPN files, open Tunnelblick’s configuration screen by clicking on its icon in the menu bar. Select VPN Details… from the drop down menu.

![]()
6. To add configuration files to Tunnelblick, drag and drop the .ovpn files from Finder into Tunnelblick’s left-side menu pane. Do not drag over any other file types, like .crt or .pem files.

7. Tick “Apply to All” and click “Only Me” in the next window.

8. The configurations will automatically be added to Tunnelblick’s menu and available for connection.
Connecting & Disconnecting from VPN Configurations
Now that we’ve set up OpenVPN configurations, we can connect to them from the same Tunnelblick menu.
1. To start a new VPN connection, click on the Tunnelblick menubar icon and click on a configuration.

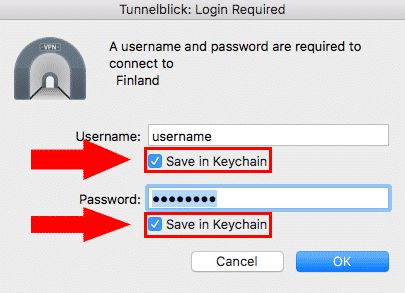
2. Enter your username and password for your VPN provider and click OK.

3. A small notification window will pop up in the upper-right showing your VPN connection status. Once the connection is complete, the notification’s text will turn green and the window will fade away.

4. The Tunnelblick icon will also animate while the connection processes. When Tunnelblick’s icon turns black instead of light grey, you’ve connected successfully.

5. To see your connection status and public IP address, click the Tunnelblick icon and look at the first line. To disconnect, click that same menu item labelled Disconnect All.

Sharing Credentials Across VPN Configurations
If your VPN provider has multiple exit nodes or configurations, you can set up Tunnelblick to use the same login credentials for all of them. This saves you constantly retyping your credentials, which can be long and hard to remember.
In testing, this process has proven a little buggy. If possible, set up sharing credentials immediately after you’ve installed your VPN configurations to avoid any potential issues.
1. Click on the Tunnelblick icon in the menu bar.
![]()
2. Select VPN Details… to open the configuration menu.

3. In the configuration menu, click on the Settings tab. Then click the button labelled Advanced… to open the advanced configuration menu.

4. Under the VPN Credentials tab, tick the box next to All configurations use Common credentials. This will set all your VPN configurations to use the same username and password.

5. To save the username and password that the credentials will use, log in to a VPN connection that doesn’t already have saved credentials.

6. Type in your username and password. Tick Save in Keychain under both the username and password to save your login information as common credentials.

7. After you log in, Tunnelblick will save those credentials and apply them to any other VPN connections you initiate.
Conclusion
Tunnelblick is a strong OpenVPN client for macOS that can handle multiple configurations at one time. It can also help improve security and ease of use if your VPN provider’s client is buggy or badly designed. Just get OpenVPN configuration files from your VPN provider and you’ll be good to go.
You might also like:


