

 You can secure your computer, your web browser, and your WiFi router, but that still won’t keep the hackers (or The Man) from seeing what you’re doing online — or outright stealing your data. For that kind of absolute security, you need a Virtual Private Network. Here’s how to get a VPN and how to set it up on your Mac.
So what’s a VPN? A Virtual Private Network makes your WiFi or broadband Internet connection secure. That is, the connection itself, which is not secured by your standard antivirus/malware package, secure webpages (the ones that start with “https”), or WiFi password. All of those things are great, but once you’ve established a connection to the Internet, you’re putting your data out into the digital soup of the World Wide Web and receiving data from it. And the various security measures you’ve installed on your end won’t keep prying eyes from watching or intercepting your coming and going traffic (aka, data). If you’re at home using your own WiFi router, then you’re probably safe, but if you share WiFi with others or connect via a public hotspot, you’re opening yourself up to potential attack.
That’s where VPNs come in handy. It creates a virtual network that multiple computers and devices can connect to that keeps each one secure. When you surf the Web or check your email through a VPN, it secures the entire connection — not just your end but whatever part of the Internet you’re connecting to — by channeling your traffic through a secure “tunnel” that encrypts the data so it can’t be unscrambled by anyone but you.
Picking a VPN provider is kind of like picking an ISP (that’s an Internet Service Provider, like Time Warner, Comcast, Earthlink, AT&T, etc.). Both services are provided to you for a monthly fee. There are loads of VPN providers to choose from, each offering different options and prices, though most of them run between $5 and $10 a month. Choosing one is just like shopping for anything else: smart users will shop around first. I like BestVPN for its smart comparisons and thoughtful reviews.
Apple is known for making complicated computer tasks easy, and your Mac’s VPN setup is a prime example of this because it couldn’t be simpler. Click on System Preferences, and then click the Network icon. On the left, you’re going to see a list of your available network connections. Click the plus symbol at the bottom of that list, because we’re going to add a new connection.
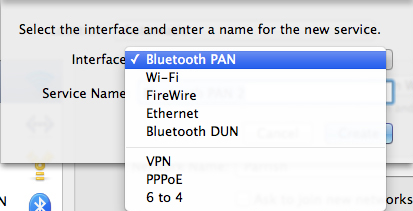
A new menu will slide out from the top. Under Interface, pick VPN (probably the sixth item on the menu).
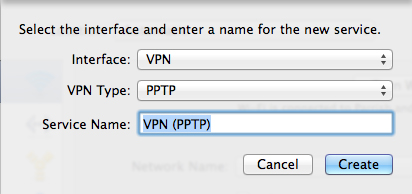
Another option will appear, letting you select the kind of VPN service you’re going to connect to. You don’t have to know anything about these VPN types; your VPN service provider will tell you what to use for this setting. The next option lets you name your VPN service, and you can call it whatever you want. Click the Create button when you’re ready.
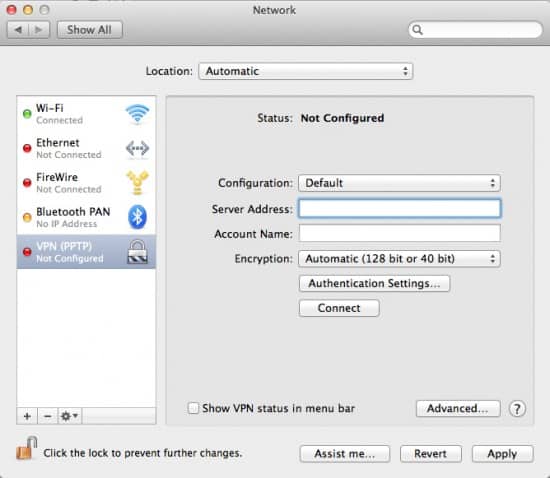
Now your VPN will be listed in that sidebar menu, but you still have to configure it. Referring again to the info given to you by your VPN provider, enter the server address and account name.
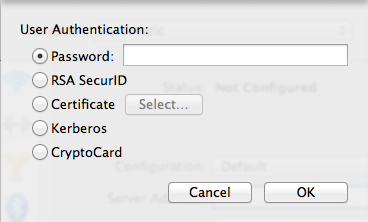
Click the Authentication Settings button and type in the password your VPN provider gave you. Then click OK, and then Connect.
Congratulations, your Mac is all set up and ready to preserve your anonymity online.
More Mac Tutorials:
- How To: Rename Your Mail Flags For Better Prioritizing
- How To: Make Launchpad Useful
- How To: Spruce Up Mail With Contact Photos
- How To: Turn Off OS X’s “Natural Scrolling”

One thought on “How to Set Up a VPN On Your Mac”
It’s difficult to find a vpn that suits your needs and does not slows your internet connection. I just got a first subscription with CyberGhost VPN as they cut off prices and gave up on limitations. https://starvpnreviews.com/new-cyberghost-vpn-unlimited-bandwidth-lower-charges-discount/