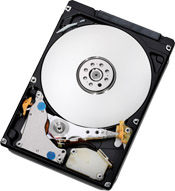
Me and the wifey did pretty well for ourselves this Christmas. After all, with a kid on the way and both of our birthdays within a month or so of the big holiday, we took home a pretty decent chunk of change. Once we bought all of the baby stuff we needed, I decided to pick myself up a little present of my own – a new hard drive for my MacBook Pro.
After some searching, I found this bad boy on Newegg. Normally, I would’ve just ordered it from them, but the Fry’s Electronics less than a mile from my house had it for $10 cheaper, so I headed down and picked one up. A few hours later, I was ready to go with my install, tools in hand, ready for some excitement. What followed was a little less than exciting.
When I installed Snow Leopard on my 15-inch MacBook Pro, I experienced a few little problems here and there that would have been resolved with a fresh install, so I decided to hook my new 500 gb drive to an external enclosure and start new.
I started by writing zeros to the drive using Disk Utility, then I installed Snow Leopard on the drive via the USB drive with no problems to speak of. The drive booted up fine, ran great, now I just needed to transfer over all of my programs. I decided to use the migration tool to get it done.
6 hours later …
I installed the new drive in the computer which took all of 5 minutes to do once I found the correct screwdriver. Then I fired it up. It was peppy, responsive, and since it had over twice the previous capacity of my old drive, roomy. I loved it.
And then the problems started happening.
Daylite wasn’t working correctly. An e-mail was sent off to the company to ask for help, but it was a Sunday and I needed the computer to be operating 100% the next morning, so I decided instead to go with redoing the install, but this time, handling things a bit differently.
I pull the new drive out of the MBP and swap it for the old one, boot it up and put the new drive in the external enclosure. Once again, I write zeros to the drive, and this time used Carbon Copy Cloner to clone the new drive from the old one. The next day I swap the drives and I’m good to go. Sure, the old quirks are still there, but at this point I’m used to it so it’s not that big of a deal. There’s really only one issue so far. Whenever I right click a file and go to “open with,” I get this:
It’s a bit hard to see, but all of my programs are doubled. Not sure why, but both versions open up the program, so until I figure out what it is, I’ll just deal with it.
It’s been a few weeks now, with no issues to speak of. It’s nice to see all that free disk space, which makes my life a lot easier. Being a photographer, I go through gigabytes of storage pretty quickly. This is a great option for local storage, plus my Time Machine can back it up easily. I’m not planning on filling up the drive, but it’s good to know that if I needed to, I’d be alright.


2 thoughts on “Drive Swapping – Installing a New Drive in a MacBook Pro”
https://support.apple.com/kb/TA24770?viewlocale=en_US
I hope this helps, I have also sent you an email at the info @ address.
Miraj
Always nice reading your articles Kev. I’ve been a lurker on this site for some time now and keep coming back mainly cuz of your articles. Keep it up